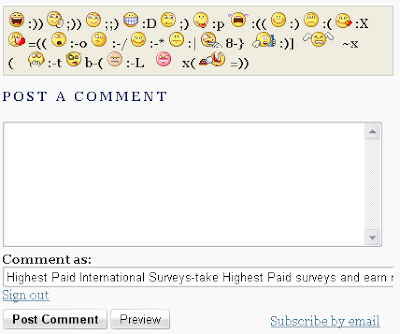
How To Add Yahoo Smileys Emotions to your Comments

1.Login to your dashboard--> layout- -> Edit HTML

2.Click on "Expand Widget Templates"

3.Scroll down to where you see this :

<p class='comment-footer'>
<b:if cond='data:post.embedCommentForm'>
<b:include data='post' name='comment-form'/>
<b:else/>
<b:if cond='data:post.allowComments'>
<h3><a expr:href='data:post.addCommentUrl'
expr:onclick='data:post.addCommentOnclick'>
<data:postCommentMsg/></a></h3>
</b:if>
</b:if>
</p>
</b:if>


4.Now replace above code with below code.

<p class='comment-footer'>
<b:if cond='data:post.embedCommentForm'>
<div style='-moz-background-clip: -moz-initial; -moz-background-origin: -moz-initial; -moz-background-inline-policy: -moz-initial; width: 369; text-align: left; border: 1px solid #cccccc; padding: 5px; background: #eeeddf; height:86'>
<b>
<img border='0' height='18' src='http://us.i1.yimg.com/us.yimg.com/i/mesg/emoticons7/21.gif' width='18'/> :))
<img border='0' height='18' src='http://us.i1.yimg.com/us.yimg.com/i/mesg/emoticons7/71.gif' width='18'/> ;))
<img border='0' height='18' src='http://us.i1.yimg.com/us.yimg.com/i/mesg/emoticons7/5.gif' width='18'/> ;;)
<img border='0' height='18' src='http://us.i1.yimg.com/us.yimg.com/i/mesg/emoticons7/4.gif' width='18'/> :D
<img border='0' height='18' src='http://us.i1.yimg.com/us.yimg.com/i/mesg/emoticons7/3.gif' width='18'/> ;)
<img border='0' height='18' src='http://us.i1.yimg.com/us.yimg.com/i/mesg/emoticons7/10.gif' width='18'/> :p
<img border='0' height='18' src='http://us.i1.yimg.com/us.yimg.com/i/mesg/emoticons7/20.gif' width='22'/> :((
<img border='0' height='18' src='http://us.i1.yimg.com/us.yimg.com/i/mesg/emoticons7/1.gif' width='18'/> :)
<img border='0' height='18' src='http://us.i1.yimg.com/us.yimg.com/i/mesg/emoticons7/2.gif' width='18'/> :(
<img border='0' height='18' src='http://us.i1.yimg.com/us.yimg.com/i/mesg/emoticons7/8.gif' width='18'/> :X
<img border='0' height='18' src='http://us.i1.yimg.com/us.yimg.com/i/mesg/emoticons7/12.gif' width='18'/> =((
<img border='0' height='18' src='http://us.i1.yimg.com/us.yimg.com/i/mesg/emoticons7/13.gif' width='18'/> :-o
<img border='0' height='18' src='http://us.i1.yimg.com/us.yimg.com/i/mesg/emoticons7/7.gif' width='20'/> :-/
<img border='0' height='18' src='http://us.i1.yimg.com/us.yimg.com/i/mesg/emoticons7/11.gif' width='18'/> :-*
<img border='0' height='18' src='http://us.i1.yimg.com/us.yimg.com/i/mesg/emoticons7/22.gif' width='18'/> :|
<img border='0' height='18' src='http://us.i1.yimg.com/us.yimg.com/i/mesg/emoticons7/35.gif' width='24'/> 8-}
<img border='0' height='18' src='http://us.i1.yimg.com/us.yimg.com/i/mesg/emoticons7/100.gif' width='31'/> :)]
<img border='0' height='18' src='http://us.i1.yimg.com/us.yimg.com/i/mesg/emoticons7/102.gif' width='44'/> ~x(
<img border='0' height='18' src='http://us.i1.yimg.com/us.yimg.com/i/mesg/emoticons7/104.gif' width='30'/> :-t
<img border='0' height='18' src='http://us.i1.yimg.com/us.yimg.com/i/mesg/emoticons7/66.gif' width='18'/> b-(
<img border='0' height='18' src='http://us.i1.yimg.com/us.yimg.com/i/mesg/emoticons7/62.gif' width='18'/> :-L
<img border='0' height='18' src='http://us.i1.yimg.com/us.yimg.com/i/mesg/emoticons7/14.gif' width='34'/> x(
<img border='0' height='18' src='http://us.i1.yimg.com/us.yimg.com/i/mesg/emoticons7/24.gif' width='30'/> =))
</b>
</div>
<b:include data='post' name='comment-form'/>
<b:else/>
<b:if cond='data:post.allowComments'>
<a expr:href='data:post.addCommentUrl' expr:onclick='data:post.addCommentOnclick'><data:postCommentMsg/></a>
</b:if>
</b:if>
</p>
</b:if>


5.Now Download Smiley.js ( As a zipped file ) and host Smiley.js yourself using free js hosting service provider like HotLinkFiles.com or 110mb.com.

6.Now Scroll down to where you see </body> tag in your template.

7.Copy below code and paste it just before the </body> tag .

<script src='smiley.js' type='text/javascript'/><noscript><a href="http://bloggertipandtrick.blogspot.com/" target="_blank">Blogger Tips And Tricks</a></noscript>


Note: Replace smiley.js with your direct hosting link of smiley.js .

8.Now save your template and you are done.It will look like this.

How To Insert Adsense Ads In Blogger Post

This will explain how to Embedd adsense ads in between posts body.
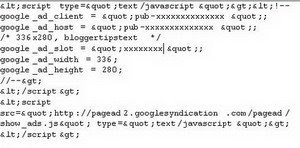
1.Generate Parsed code for adsense code because we cannot put adsense code directly in the xml.So parse it using AdParser.
2.After parsing,your ad code Should look like this.


How To Place ad above or below your post header
log in to your dashboard--> layout- -> Edit HTML
Click on "Expand Widget Template" and  scroll down  to where you see this:-
<div class='post-header-line-1'/>
To place ad above your post header.Paste the code above this line.
To place ad below your post header.Paste the code below this line.
How To Place ad end of your post body

log in to your dashboard--> layout- -> Edit HTML
Click on "Expand Widget Template" and  scroll down  to where you see this:-
<p><data:post.body/></p>

Paste the code below this line, to show your ad at the end of your post.

NOTE : To Set the Align of your ad , Insert your code like this.
<p align="center"> Your Ad code
</p>


Replace "
center" with "left" or "right" for desired alignment.

How to Embed Adsense add unit in Left or Right corner of post content

This will explain How to Embed Adsense add unit in Left or Right corner of post content.
Generate Parsed code for adsense code because we cannot put adsense code directly in the xml.So parse it using AdParser.
After parsing,your ad code Should look like this.


1.Log in to your dashboard--> layout- -> Edit HTML
2.Click on "Expand Widget Templates"
3.Scroll down to where you see this:-
<div class='post-header-line-1'/>
4.To place ad Top left corner of your post ,Paste the below code, below of above line.
<div style=”display:block;float:left;margin: 0px 10px 0px 0px;”>
Your Adsense Parsed code
</div>


Attention :  We can't put "<div style=”display:block;float:left;margin: 0px 10px 0px 0px;”>" and "</div>" directly in the xml.So we must generate Parsed code for these code using AdParser.
So Final Code you have to copy below the line "<div class='post-header-line-1'/>" ,look like this.

If you Want To place ad Top Right corner of your post,Replace "left" with "right".
5.Click on "Save Templates" and Refresh your site.

How To Remove Low paying Adsense Ads

To increase your Adsense Earnings by removing the lowpaying adsense ads from your account,follow the steps below.

1.First go to www.adsblacklist.com .


2.Now Signup for a account.it's free and very simple.

3.Now login to your account.

4.Now Click on My Account.


5.Now click on 'Add New Domain'


4.Submit your URL,TITLE and Keywords.Look at the example below.


5.Now go to Generate Filter List.


6.Drag and drop your domain name into 'Keywords from selected domains:' box.Then you can see keywords,you give in step 4.

7.Now select 'MFA' and 'LCPC'.


8.Now click on Submit.

9.They will give you lowpaying ads urls.copy these urls.

10.Now login to your Google Adsense Account.

11.Click AdSense Setup.


12.Go to Competitive Ad Filter category.


13.Paste lowpaying ads urls into the box and click save changes.


14.Now google will not display low paying ads in your site.

23 Free High Quality Social Media Icons Sets

This is my second high quality social bookmark icons colletion.You can read my previous article here.I found these beautiful clean social bookmarks icon when surfing the web.And I think to share these icons with you.So I listed below over 20 new high quality social media icons sets for you.

1 . 27 Circular Social Media Icons in 3 Sizes

I have put a very big emphasis on function in these icons with the right amount of details. There is also an icon template PSD file included!

I was compelled to design these icons when through searching the web I couldn’t find a suitable set of simple, circular social media icons. What kind of age are we living in when you cannot find a good set of simple, sleek, circular social media icons? So here they are.

-From Designer


2 . A Life in Pixels

In this freebie icon set, you will find 16 free social media icons for sites that designers appreciate (such as deviantART, Flickr, Twitter, and more). This free icon set is called A Life in Pixels and is inspired by Minimalist design philosophies.

The set includes 16 32px x 32px PNG files. They are monochromatic and can work with many other colors, which is perfect if you are looking for icons that are subtle and muted so that they do not dominate your design.


3 . Free Social Media Bookmark Icon pack

Hate or love social media sites, they do bring you visitors to your site and the best way to do that is to show them what websites you are supporting. So I’ve designed the first 14 social media bookmark icons that you can download and use wherever you like, for free as well!


4 . Free glossy social icons

Here’s another free icon set for you. Glossy social is an icon set which consists of 20 icons for the following services: YouTube, Twitter, Digg, StumbleUpon, Flickr, RSS, Feedburner, Skype, Last.fm, Gmail, Linkedin, Yahoo, Facebook, Delicious, mySpace, reddit, Friendfeed, Wordpress, Vimeo and a generic “Favorite” icon.


5 . Free Set of Social Media Icons – Rivet Social

The result is a set of 14 riveted brushed steel icons that not only include the basics but DesignBump, DesignMoo, and DesignFloat as well! You’ll find 14 different 64px x 64px icons in this set in .jpg format.


6 . Free Vectors Icon Sets

Here’s some more free vectors! There in color, and black and white, and they retain there ‘coolness’ when resized. There simple, clean icons, which I hope you enjoy!.Below are the color versions of the icons.


7 . Function Icons Set

They are only available in 48×48px. These free icons are exactly that, free! You can use them anywhere.Included some of the main Social Media Icons such as: Design Float, Digg, Delicious, Furl, Technorati, Flickr, Stumble Upon, Twitter & Many more…


8 . Google and Facebook

The items are for your personal use only. Do not modify or redistribute any contents of the available packages without permission. If you plan on using these icons in a project of yours (freeware or otherwise), please contact the authour before doing so.


9 . Google Tango Icon Set 2

Great Google Tango PNG icons for your collection.
Quality : PNG quality
Format of collection *.zip (archive)


10 . Matte White Square Social Icons

108 Matte White Square Social Networking/ Social Media Icons 512px * 512px.
Free for personal and commercial use ~ no attribution nec.


11 . Free Social Media Icon Set - Noupe

6 beautiful and clean icons: New RSS, Twitter, Del.icio.us, Stumble Upon, Facebook and Email. This set was designed by IconShock and released exclusively for Noupe and its readers.The files are transparent PNGs, and the source file (.psd) is available for download as well (see the links below). The set is completely free and may be used for any private or commercial project without any restrictions.


12 . Social Media Icons by Plechi

Social media icons in vector for free

Google,Yahoo,RSS,Facebook,Twitter,MySpace,last.fm,Technorati,Vimeo,Stumble Upon,Linked in,Youtube,Reddit,Delicious,digg,Flickr


13 . Polaroid icon set

Here’s another free icon set for you. 16 PNG icons on some of the most popular web services. YouTube, delicious, RSS, Twitter, Facebook, Flickr, Digg, stumpleupon, mySpace, Feedburner, Skype, Yahoo, Last.fm, Linkin, Reddit and Gmail. As always, these icons are free to use on any kind of project both personal or commercial. The only thing that you cannot do is sell them.


14 . Red Pearl Social Media Icons

108 High Res Red Pearl Social Media Icons.
PNG format.

Free for personal and commercial use - no attribution nec.


15 . Social Icons hand drawned

The icons that are included in this set are:

Blip.fm,Digg,Facebook,Firefox,Flickr,Meneame,Myspace,Technorati,Twitter,Vimeo,Wordpress,Youtube,LastFM - new,RSS - new,Blogger - new,Gmail - new,Reddit - new,StumbleUpon - new

The icons are available in the size:
24x24, 32x32, 48x48 and 64x64


16 . Blog and Photo Social Icons

This is a another great quality social media icon pack for your website or project.


17 . Social Media Mini Iconpack

This icon set consists of 30 (16×16) finely crafted social media icons. They are free to use non-commercially. Put them on your blog or on your website to help users bookmark or share your site socially.


18 . Social Network Icon Pack

The Social Network Icon Pack consists of 40+ 16 pixel x 16 pixel icons and 40+ 32 pixel by 32 pixel icons all in 32-bit PNG format.

Google,Yahoo,RSS,Facebook,Twitter,MySpace,last.fm,Technorati,Vimeo,Stumble Upon,Linked in,Youtube,Reddit,Delicious,digg,Flickr


19 . Social Web Buttons-Set 1

Might be useful sometimes graphically highlight one or more links to profiles that you want to give importance. In this first set there are aNobii, coComment, Delicious, Digg and Facebook. In the next set you will find, instead, Flickr, LastFm, Pownce and Slideshare.


20 . Social Web Buttons-Set 2

In this first set there are aNobii, coComment, Delicious, Digg and Facebook. In this set you will find, instead, Flickr, LastFm, Pownce and Slideshare.

Here you will find Flickr, LastFm, Pownce and Slideshare.


21 . Socio LEGO Social Icon Set

11 Icons in 256x256/128x128/64x64/32x32 sizes. All Files in PNG Format.

Icons are FREE for Personal & Commercial Use on Websites and other Media.


22 . Weby Icons Free Download

Weby Icon Set brings to you 100 icons at 64×64 pixels ready to be used in your application or website.
The icons are available in PNG, ICO and ICNS format. They are free to use for both personal and commercial projects, including websites, templates & software.


23 . Wood Social Networking Icons

108 high resolution wood social media icons.PNG format.Free for personal and commercial use - no attribution nec.


How to Change the Favicon in Blogger

Blogger supplies every blog with the standard orange "B" blogger favicon. Having your own unique favicon is a great way to give your blogger template both a distinct and explicit brand. These small 16X16 pixel images will most definitely help your blog stand out from the rest of the blogspot blogs.


What is a Favicon?

A favicon is a small 16X16 image located at the top of your browser in the url bar.

How to Change your Favicon

  1. First go to Layout >Edit HTML in your Blogger Dashboard.
  2. Backup your existing template before making any changes!
  3. Place the code below directly below the </head> tag in your template.
  4. <link href='http://bsaves.com/HowHero/Blogger%20Templates/moonspot/images/favicon.ico' rel='shortcut icon' type='image/vnd.microsoft.icon' /> <link href='http://bsaves.com/HowHero/Blogger%20Templates/moonspot/images/favicon.ico' rel='icon'/>
  5. Now save your template.
  6. Once your template is saved view your blog and make sure to refresh the page and delete your cookies.

Creating your own Favicon

  1. Replace the image URL (2X) with your own 16 pixel by 16 pixel image hosted on the internet.
  2. http://bsaves.com/HowHero/Blogger%20Templates/moonspot/images/favicon.ico
  3. You can host your own favicon blogger image at sites such as ImageShack; PhotoBucket; Flickr; etc.
  4. Check out this Favicon Generator Tool which allows you to upload an image and it will format it for you!

Recent Posts with Thumbnails Widget for Blogger

This post explains how to add Recent Posts widget in Blogger with image thumbnails:

Yesterday, when I was working on my new Magazine style wordpress to Blogger template conversion (I'll release the template tomorrowsenyum)
..this idea popped up in my mind. This feature is also requested so many times here.. so, here we go..
After many trial n errors, I finally did it!sengihnampakgigi

Features:
Thumbails to Recent Posts
Comment Count

So, let's see how to install this cool widget in your blog..

1. Sign into Blogger dashboard
2. Go to Layout » Add a gadget » html/javascript

3. Just copy and paste this code..


<script language="JavaScript">

imgr = new Array();


imgr[0] = "http://i43.tinypic.com/orpg0m.jpg";

imgr[1] = "http://i43.tinypic.com/orpg0m.jpg";

imgr[2] = "http://i43.tinypic.com/orpg0m.jpg";

imgr[3] = "http://i43.tinypic.com/orpg0m.jpg";

imgr[4] = "http://i43.tinypic.com/orpg0m.jpg";
showRandomImg = true;

boxwidth = 298;

cellspacing = 8;

borderColor = "#ffffff";

bgTD = "#000000";

thumbwidth = 40;

thumbheight = 40;

fntsize = 12;

acolor = "#666";

aBold = true;

icon = " ";

text = "comments";

showPostDate = false;

summaryPost = 40;

summaryFontsize = 10;

summaryColor = "#666";

icon2 = " ";

numposts = 5;

home_page = "http://schemar-mag.blogspot.com/";

</script>

<script src="http://myblogtalk.com/bloggertemplates/js/recentposts_thumbnail.js" type="text/javascript"></script>


Explanation:


(Edit the values to fit your blog)

boxwidth - Width of the widgetcellspacing - Space between cells (default one is good)
borderColor - Border color (add the background color of your template to perfectly blend it in the template)
thumbwidth & thumbheight - Width and Height of the thumbnail (default are good)fntsize - Font size of the titleacolor - Color of the titleaBold - you want bold titles? (true or false)
numposts - How many posts you want to show?
home_page : http://schemar-mag.blogspot.com/ (change this to your blog url)
This script is currently hosted in my server ( http://myblogtalk.com/bloggertemplates/js/recentposts_thumbnail.js ).
But, it is STRONGLY Recommended to download the script and upload to your own hosting (google for free javascripts hosts) and replace that url with yours.

4. Last but not the least.. Save the Changes.

That's it guys!

Note : Make sure you selected YES in Settings » Site Feed » Full » Allow Blog Feeds

How to limit Rss feeds in Blogger (blogspot) Blog


If you have a relatively new blog, limiting its RSS feeds, is a good thing to do .. because now a day .. Many spammers use automated bots, blog entries, and can remove their blogs via RSS feeds ... Their blogs have great authority because of his age blog, which can be crawled and indexed faster in search engines than yours .. As soon as the blog pages are indexed, search engines can be as duplicate content. (Since the same content already indexed before) ..

Therefore, this video tutorial, .. like your Blogger feed line Only part of the content is visible in RSS feeds .. Once your blog is an authority, you can take the full RSS feed back if you wish.

How Can I Customize My Blogger Template With My Own Headers?

How to Customize Your Blogger Template with Your Own Headers
If you are not too happy with the default header in Blogger, you now can make one for yourself. You can use image editing tools, Adobe Photoshop, MS paint, and lots more. You can change colour, width, height and arrange it according to your tastes.
Steps to follow while making your own header is listed below:
1. Sign in to your blogger’s account. .
2. Click on Layout and then Edit HTML.
3. Make sure that you have backup of all your blogs. You can do that by Downloading Full Template.
4. In the HTML template you have to look for the below mentioned code:
<div id=’header-wrapper’>
<b:section class=’header’ id=’header’ maxwidgets=’1′ showaddelement=’no’>
<b:widget id=’Header1′ locked=’true’ title=’Header (Header)’ type=’Header’/>
</b:section> </div>
5. Now here you have to make three changes and they are:
  • Change the value of maxwidgets to 2.
  • Change the value of showaddelements to yes.
  • Last but not the least, change the value of locked to false.
6. Now after you are done changing, go to Page Elements but remember to save the templates. In the header section you will find a new feature called ‘Add a Gadget’.
7. This feature will let you to change the header according to your wish, and you can design it as you want it.
8. You can also add a picture in header along with giving it the hyperlink to your Blog’s homepage. To do so you have to make some changes in HTML. First of all you have to upload the picture online using tinypic, imageshack, photobucket which allow you to post your images for free. Go to Add a Gadget and click on it, then in HTML/ JavaScript do the following:
  • Title field should be blank.
  • Put your blog address and link of your image in “your blog URL” and “link to you image” respectively. Don’t forget to save it.   For example, <a href=”YOUR-BLOG-URL”><img src=”LINK-TO-YOUR-IAMGE”></a>
  • To get rid of old header go to Edit and click on Remove
  • Now you have created your own Header for your blog

Download YouTube High Definition Video Clips Quickly

Download YouTube High Definition Video Clips Quickly
The world has become completely technology based, and so many services are hitting the market day by day. The YouTube video sharing website allows users to upload different kind of videos. The quality of videos was not so much good in earlier days when it started.


However, users demands high quality videos to enjoy their leisure time. Therefore YouTube has incorporated “Watch in High Quality” option on their website, so users can easily watch videos with high definition quality.
The quality of these high definition videos is absolutely superb as it provides 720 X 1280 pixels widescreen video clips. Watching high definition videos is really interesting and fun. However, there are few problems that always associated while you watch high definition video such as video streaming error. 
The most common problems are slow network connection or network congestion, noisy connection, slow computers, etc. It is quite obvious that these kinds of problems interrupt the continuity of watching videos. When you encounter this kind of problems you will be frustrated.
Now, you can easily get rid of these problems by downloading full HD videos from the internet. Once you download the full HD videos form the internet then you can easily watch them later without any interruption. All you need to download full HD movies in order to enjoy watching movie.  You can use different application to download full HD movies to watch it later.
If you do not want to install any application then there is an easy way to download full HD videos.  You need to add this following script in your web browser:
javascript:window.location.href = ‘http://youtube.com/get_video?video_id=’ + swfArgs['video_id'] + “&fmt=22″ + “&l=” + swfArgs['l'] + “&sk=” + swfArgs['sk'] + ‘&t=’ + swfArgs['t'];

So whenever you need to find out the HD labeled videos, just visit that particular website and add in your bookmark. You can add this bookmark in your web browser whether it is Firefox, Google Chrome, Internet explorer etc. Now you can save your selected video files in your hard disk.
 

How Java scripts works:
  1. Launch Firefox web browser.
  2. Navigate to Bookmarks at menu bar.
  3. Users can navigate to “Organize Bookmarks”, click on Organize>> New Bookmark.
  4. Users can also add Bookmark via navigating to “Organize Bookmarks”, after then click on “New Bookmark”.
  5. Users will get a message “New Bookmark” on Window screen where they need to add java script to Location. Additionally you need to enter specific name on the name box for example: Quick YouTube download.
  6. Now finally click on “Add” option in order to add bookmark.
 

Now users can easily find the HD labeled videos directly over the bookmark website. This given process is applicable for Internet Explorer and Google Chrome. By following these given steps users can easily add website in the bookmark folder. Users will get their favorite HD videos from there without any delay.
 

However this same method works for HQ (High quality) video with slight alternation in the above given java script as follows:
javascript:window.location.href = ‘http://youtube.com/get_video?video_id=’ + swfArgs['video_id'] + “&fmt=18″ + “&l=” + swfArgs['l'] + “&sk=” + swfArgs['sk'] + ‘&t=’ + swfArgs['t'];

How Can I Improve My Blog Rankings And Become A Better Blogger

Three Factors Can Make You a Better Blogger
Yes, it is as easy as it sounds. If you want to be a better blogger, if you want to achieve success through blogging, then you just need to follow the three words rule. These three words are like bible for the bloggers. So, if you really want to know these three words and be successful in making the blogs, then just keep on reading it.
Those three words are:
  • Relevant
  • Powerful
  • Inspiring
It might seem to be simple words with uncomplicated meaning but that is not true. In the blogging world, these three words have got the greatest importance. Let’s find out what it is all about.
1. While you are creating your Blogs, you will need to make sure that you focus completely on the niche you choose. If you waver away too much from your main topic, you might distort the readability and value of your Blog. Then their contents might not interest the readers, and you will see your Blog traffic thinning down or becoming scarce.
2. Each and every word that is used should be in its right place and must be used properly with meaningful purpose. Don’t just scribble anything that comes to your mind. In case of sensitive and volatile subject, you have to use various significant words that suit the accuracy of the sentence.
3. Last but not the least, here comes the most essential and the inspiring part. There are two different kinds of writers, one who is good and another, who is great. The only thing that differentiates them is their writing style.

To be honest, writing an inspiring article brings the about a world from a writer. If the reader moves on thinking that it was nice after reading your article then you are a good writer but if the reader actually does what you have asked them to do through your article then you are a great writer.
Try to follow these three simple words and write mind-blowing Blogs
Looking for work from home opportunity? Leave a comment and I’ll get back to you.

Code To Show Advertisements Only On Homepage Or On Particular Post Page

Displaying Different Ads on Homepage and Individual Blog Posts
Displaying similar ads on all pages including homepage results in reduced clicks and low CTR (tips to increase CTR). Low CTR definitely means less revenue generation through AdSense. It is a good idea to display different set of ads on different posts to keep the visitor hooked to your blogs. A user can easily display new ads on your homepage and individual posts on both blogger and WordPress blogs.
A user is required to use some Conditional Tags along with the advertisement code. A single condition tag can be used to display ads on your homepage only, and another tag can be used to display ads for all your posts. This allows showcasing different ads for homepage and your posts.
A square banner of size 336*280 and 300*250 can be used to display ads for your posts. If a user wishes to display different ads for every single post, they can do so by adding a new Condition tag.
Steps to display ads on your individual posts and homepage on blogger:
To display ads only on your homepage, change the ad code as follows:
<B:if.cond=’data:blog.pagetype !=&quot;item&quot;’> your advertisement code </B.if>
To display ads on your individual posts, change the ad code as follows:
<B:if.cond=’data:blog.pagetype ==&quot;item&quot;’> your advertisement code </B.if>
Steps to display ads on individual posts and homepage on wordpress blogs:
To display ads only on your homepage, change the ad code as follows:
<?Php if (is_home()).{ ?>
your advertisement code
<?Php “ ?>
To display ads on your individual posts, change the ad code as follows:
<?Php if (is_single()).{ ?>
your advertisement code
<?Php “ ?>
Substitute your advertisement code with your AdSense advertisement code. If a user wishes to display same advertisements in all pages including homepage, then a user will have to remove the condition tags.

Make Free Calls To Canada And USA

Free calls are considered to be a gimmick, as most of the online communication service provider’s end up asking credit card information.
Only a few occasional online sites that in reality render costless call to most of the countries. One among these rare online sites is Free Ringer.

Free Ringer is a free online calls service provider, which neither demands you any remuneration for your calls nor asks you to download any PC software’s to establish connections.
Free Ringer permits everybody to establish free online telephone connection’s not only to Canada and USA, but also to other 50 backed nations.
To establish free call service, an individual is required to open an account with Free Ringer and enable email verification. The entire procedure consumes lesser than 2 minutes.
Once the account is created an individual is asked to login with details and commence establishing free calls.
Simple steps to establish free online calls as follows:
  • First of all an individual is asked to login to their Free Ringer Account.
  • Once logged in they are required to dial the desired number, and wait till the online telephonic call is established to the respective number.
  • Once the call is connected a user gets a free 10 seconds to converse to the person amid user is required to inform receptor to call back on the same incoming number.
  • After completion of 10 free seconds, automatically telephonic conversation will be placed on hold. In the meantime Free Ringer notifies the receptor by sending an SMS to respective number to initiate the call.
  • Once receptor calls back on that number, Free Ringer will establish connection automatically amid both callers
  • Now, an individual can continue with their pleasant long lasting conversations.
The receptor calling the number back will cost them few nominal local call rates. Similarly an individual can establish Free ISD calls.

Free Japanese USA VPN Account To Play Games – Use It In China, India, Pakistan, Dubai, Bahrain, Just Anywhere !

Free Japanese USA VPN Account To Play Games – You can use it from anywhere in China, India, Europe, US, Indonesia, Malaysia, Singapore, Australia,Africa, Dubai, Bahrain, Pakistan – I’d say just name a place and you can use it from there!
To start with, those who have no idea what VPN is, please read this post – Virtual Private Network.
If you are wondering why you should have a VPN account, then listed below are some of the benefits of owning a VPN account:
* Security for Hotspot Wireless Access Users
* Home Internet Users – Cable and DSL providers are well known for not filtering their network from exploits!
* International Internet Users – Governments would like to prevent users from enjoying the Internet, with a USA IP there are no controls!
* Easy online ordering when you travel – Many order forms on the Internet will automatically block certain countries from even ordering.
* Bypass ISP Blocking for VOIP Applications like Skype
* Full anonymity by hiding your real IP.
* Unlike a proxy, you get secured connection for all programs you are using, (e.g ICQ, Email, FTP, News and anything that uses a Internet Connection)
* American Based Unique Personal Fixed USA & Euro IP’s
* Anonymous Internet Surfing
* Play any USA or Europe online games
* Bypass geographical blocks from certain websites
* Protection against your ISP
Now I assume that everyone here knows what VPN is, lets come to the sweeter part. All users who visit this blog often, now stand a chance to win a free account VPNTraffic – VPN Service providers from USA, JAPAN and many more places to be added, means, you can literally browse from a filtered network, just from anywhere !
We’ll be giving away 20 accounts from VPNTraffic via this post. Here’s the criteria for it:
1> If you are a blog owner, then write a post about this give-away contest and leave the link in the comments section. Please ensure, you write a meaningful post and not just one liner or a small paragraph.
2> If you do not own a blog, then leave a comment (a meaningful one, which can be selected), and I’ll pick 20 winners from the list later on. Write – where you are from, why do you want this account, how will you use this account, have you tried any other VPN service, and if you did what was the reason for you to give up with them.
Again, here let me emphasize that quality of comment matters, as I’ll out rightly delete the comments that do not meet quality standards, and being a chief editor on this blog, trust me I have to rights to do so ;) .
Now get your gears on, go on comment, and win Free VPN accounts to Play games, work from office, or do something more productive ;)
Visit [ www.vpntraffic.com ]

Twitter Delicious Facebook Digg Stumbleupon Favorites More

 
Design by Free WordPress Themes | Bloggerized by Lasantha - Premium Blogger Themes | fantastic sams coupons